


Como artista, podrías esbozar un dibujo a lápiz antes de decidirte a pintar.
Usas el mismo proceso al crear un objeto con software de modelado 3D. Diseñas un objeto primero, y luego, una vez que el concepto está completo, añades detalles, color, sombras y otros elementos de diseño mediante el mapeo UV.
¿Qué es el mapeo UV?
El mapeo UV es el proceso de modelado 3D de proyectar una imagen 2D sobre la superficie de un modelo 3D para crear un mapeo de texturas. El objeto 3D se despliega y se le aplica la textura 2D.
Un mapa UV es un diseño 2D de la superficie de un modelo 3D que ayuda a aplicar texturas al modelo. La "U" y la "V" representan las coordenadas horizontales y verticales de la textura. Funciona como desplegar un objeto 3D (como una caja) sobre una superficie plana para que puedas colocar con precisión una imagen 2D sobre él.
Las letras U y V se utilizan para definir el mapeo UV porque significan el eje de la textura 2D en la cuadrícula UV. X, Y y Z se utilizan para los ejes en el objeto 3D.
Los diseñadores que trabajan con este tipo de software siempre buscan crear texturas nuevas y diferentes para aplicar a sus modelos 3D. Una amplia variedad de texturas resulta en modelos más realistas. Además, los artistas no tienen que renderizar un objeto completamente nuevo cada vez que crean algo nuevo.
En general, el mapeo UV ahorra tiempo a los artistas 3D y facilita y acelera el mapeo de texturas en objetos 3D.
Elementos del mapeo UV
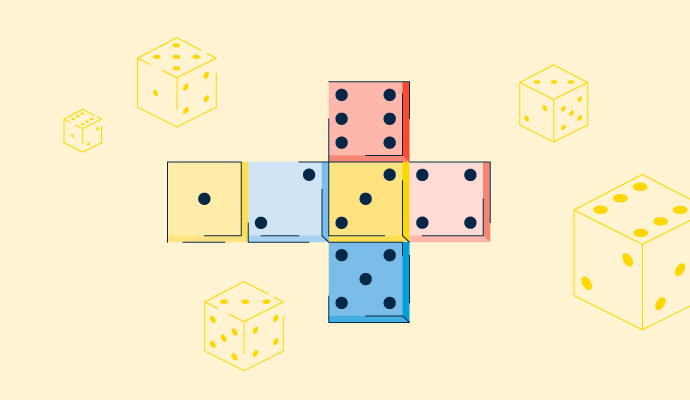
El mapeo UV funciona desplegando o desenvolviendo el modelo 3D en las costuras y colocándolo plano en un espacio 2D, similar a cómo harías un patrón al coser un nuevo par de pantalones o un suéter. Este es un paso crucial en modelado 3D porque no existe tal cosa como una textura 3D ya que se basan en una imagen 2D.
Cuando el mapeo está completo, el diseñador puede producir una imagen personalizada basada en el patrón y luego aplicarla al modelo 3D.
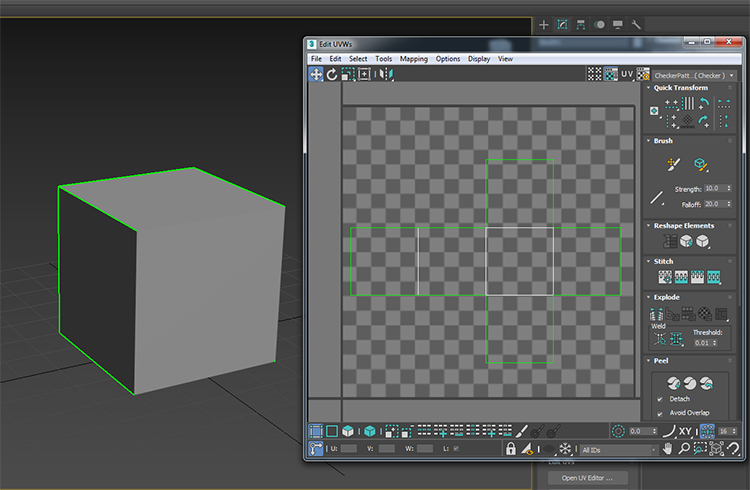
Un desplegado UV básico
Fuente: Autodesk 3DS Max
En 3D, el eje horizontal x será la U en el espacio 2D, donde el eje vertical y es la Y. El mapeo UV da a los modelos 3D un color y detalle mejorados con menos limitaciones que otros procesos.
Una buena manera de entender el mapeo UV es pensar en ello como si estuvieras haciendo un cubo con un trozo de papel. Es el mismo concepto, solo que hecho al revés. Aunque esto suena desafiante, el software de modelado 3D tiene características integradas, modos de edición y modos de objeto que hacen que el mapeo UV sea lo más fácil y directo posible.
Los 5 mejores software de modelado 3D:
* Estas son las cinco principales soluciones de software de modelado 3D del Informe Grid® de Primavera 2022 de G2.La mayoría de las plataformas de software 3D también tienen blogs dedicados a ayudar a los usuarios a hacer que el mapeo UV funcione, con un flujo de trabajo paso a paso basado en características y funcionalidades únicas del software.
Por ejemplo, Maya tiene instrucciones aquí. Blender también tiene su propio Wiki para ayudar a los diseñadores con el mapeo UV con varios tutoriales e información dentro de su editor UV.
Las instrucciones paso a paso reales para cómo mapear UV dependerán del software en uso, por lo que es una buena idea revisar el blog de tu herramienta preferida.
Hay algunos componentes del mapeo UV que los diseñadores 3D deben conocer, incluyendo texturas, costuras, UVs superpuestos y canales UV.
Texturas
Un mapa UV tendrá texturas visibles que "colorean" tu modelo 3D. Puedes tener varios tipos de texturas, dependiendo de lo que estés buscando crear. Aunque hay muchas, algunas de las texturas más comunes son:
- Mapa difuso: Da a un modelo 3D color básico. El software de modelado 3D lo usa para reflejar sombra y luz.
- Mapa de albedo: Similar a un mapa difuso pero podría no contener iluminación contrastante. Mostrará el color básico de un objeto sin sombras ni reflejos.
- Mapa especular: Controla la cantidad de color y luz reflejada por el objeto sobre otros objetos circundantes.
- Mapa de oclusión ambiental (AO): Se usa para mejorar el realismo de un objeto 3D simulando sombras generadas por el entorno del objeto.
Una isla UV es un grupo de puntos UV conectados con bordes y separados de otros puntos UV del modelo por cortes de borde. La sombra y la luz en un modelo 3D pueden depender de cuántas islas UV se usen.
Ahora es el momento de obtener noticias y entretenimiento SaaS-y con nuestro boletín de 5 minutos, G2 Tea, con líderes inspiradores, opiniones audaces y predicciones atrevidas. ¡Suscríbete abajo!

Costuras
Las costuras son un elemento crucial del proceso de mapeo UV y son inevitables cuando aplanas cualquier objeto 3D. Una costura es la parte de la textura o diseño de la malla de polígonos que debe dividirse para que el diseño convierta la malla 3D en un mapa UV 2D.
Estas costuras son similares a las de nuestra ropa, pero con el mapeo UV, las puntadas se eliminan.
Definir: Una malla de polígonos es la colección de vértices, bordes y caras que componen un objeto 3D. Esta malla es lo que define la forma y el contorno de cada objeto 3D hecho con software de modelado 3D.
Una distorsión significa que la textura de la imagen y varios píxeles se ven estirados o comprimidos cuando se aplican al modelo. Mucha distorsión afecta cómo se ven los detalles en la versión final 3D del modelo al usar software de diseño 3D.
Para hacer que las costuras sean menos notorias y evitar la distorsión:
- Haz que las costuras sigan bordes duros donde generalmente son menos notorias.
- Oculta las costuras detrás de otras partes del modelo 3D. Por ejemplo, al desenvolver una cabeza, coloca tus costuras detrás de la oreja o donde estará el cabello.
- Oculta las costuras debajo o detrás del punto focal de tu modelo, donde es menos probable que las vean, como la parte posterior de una cabeza.
UVs superpuestos
Los UVs superpuestos ocurren cuando dos o más de los polígonos en tu mapa UV están uno encima del otro. Esto significa que estas dos partes del modelo mostrarán la misma área de la textura o diseño, ya que ambas ocupan las mismas coordenadas UV.
Por lo general, los artistas 3D evitan los UVs superpuestos, para que la textura del mapa UV se vea variada y consista en el diseño preferido. Sin embargo, hay ocasiones en que los diseñadores intencionalmente tienen UVs superpuestos.
Cuando una textura es básica o genérica, un diseñador puede elegir múltiples partes de la malla de polígonos sobre el mismo espacio UV para repetir la textura.
Canales UV
Los canales UV permiten que el mismo objeto tenga múltiples mapas UV. No puede haber mapas UV superpuestos con canales UV, ya que esto mostraría información de sombras en las áreas incorrectas del modelo 3D. Si los diseñadores intentan esto en software 3D, recibirán un mensaje de error dentro del programa.
Como no pueden superponerse, la solución son dos canales UV. Un UV tiene información sobre texturas, colores y otros detalles, mientras que el otro canal UV tiene información para la iluminación. Los canales UV permiten que los objetos 3D, especialmente objetos como animales y humanos, se vean más realistas con una combinación de textura, sombras y luz.
¡Pon tu modelo 3D en el mapa!
Aunque parece una parte complicada de crear un modelo 3D, el mapeo UV se vuelve más fácil con la práctica y el software adecuado. Una vez que encuentres la herramienta para ti, es hora de ser creativo y dar vida a tu modelo 3D.
Uno de los próximos pasos a dominar una vez que hayas aprendido el mapeo UV es incorporarlo en tu próximo diseño de producto para asegurarte de que cobre vida de todas las maneras correctas.
¿Quieres aprender más sobre Software de modelado 3D? Explora los productos de Modelado 3D.

Mara Calvello
Mara Calvello is a Content and Communications Manager at G2. She received her Bachelor of Arts degree from Elmhurst College (now Elmhurst University). Mara writes content highlighting G2 newsroom events and customer marketing case studies, while also focusing on social media and communications for G2. She previously wrote content to support our G2 Tea newsletter, as well as categories on artificial intelligence, natural language understanding (NLU), AI code generation, synthetic data, and more. In her spare time, she's out exploring with her rescue dog Zeke or enjoying a good book.

