

"How to get an SSL certificate?"
This question definitely brings in a lot of confusion for new website owners and administrators. Figuring out which SSL certificate you need and then finding out how to set it up while reading through all the technical jargon can cause headaches. Many website owners struggle with the complexities and try to ease them by using tools like SSL and transport layer security (TLS) certificate software.
If you are struggling with this problem, our guide here simplifies how to get an SSL certificate, even if you're new to website management.
If you’re completely new to the concept of SSL certificates, we recommend reading our comprehensive guide on SSL certificates before proceeding. Otherwise, let’s get started on securing your website!
How to get an SSL certificate for your domain?
- Decide which SSL certificate you need
- Choose a certificate authority (CA) or SSL certificate provider
- Generate certificate signing request (CSR)
- Submit the CSR to CA
- Complete the domain validation
- Install the SSL certificate
- Update your website to HTTPS
- Verify your SSL installation
1. Decide SSL certificate type you need
Before we move on to the technicalities of how to get an SSL certificate, you need to know which certificate your domain requires. Different types of SSL/TLS certificates are categorized based on the security validation they provide to domains and the number of domains and subdomains that need to be secured.
This table serves as a quick guide to help you select the best option based on your website's needs.
| Number of domains to secure | Security level | SSL certificate type | Ideal for |
| 1 | Basic (domain validation) | Domain validation (DV) certificate | Low-risk websites like personal blogs with basic forms |
| 1 | Moderate (organization validation) | Organization validation (OV) certificate | Businesses with online stores or those that need to establish trust |
| 1 | Maximum (extended validation) | Extended validation (EV) certificate | Financial institutions or websites that handle highly sensitive data |
| Single domain with multiple subdomains | Moderate (organization validation) | Wildcard OV certificate | Websites with several subdomains under one domain name |
| Multiple independent domains | Moderate to maximum (organization validation) | Multi-domain OV/EV certificate | Businesses managing multiple websites that need to secure separate domain names |
| Single domain plus protocols in addition to standard SSL/TLS encryption | Maximum (extended validation) | Unified communications (UC) certificate | Businesses that rely on secure email, webmail, and collaboration tools |
If you need more help, we've included a handy decision tree to help you navigate the options based on your specific requirements.

Want to learn more about SSL & TLS Certificate Tools? Explore SSL & TLS Certificate Tools products.
2. Choose a certificate authority
If you are wondering where and how to get an SSL certificate, certificate authorities (CA) are the answer. A CA is a trusted third-party organization that verifies a website's identity and issues SSL/TLS certificates. The certificates ensure that users can trust the website they’re visiting.
You can get an SSL certificate in two ways: from CAs like Let'sEncrypt or from web hosts and domain registrars who get it from CAs.
1. From certificate authorities directly
Typically, organizations with specific security requirements, such as e-commerce businesses, large enterprises, government agencies, or web developers managing multiple certificates, benefit most from purchasing SSL certificates directly from a CA.
If you decide to do the same, consider the following:
- Certificate type: Choose a CA that offers the kind of SSL certificate you need (DV, OV, EV).
- CA reputation: Check for a strong reputation and long-standing history in the industry.
- Compatibility: Verify the CA is recognized by major web browsers to avoid compatibility issues.
- Pricing: Evaluate different pricing plans and features to find the best value for your needs.
- Additional support: Consider options like SSL installation assistance, warranty, and security guarantees.
The top 5 SSL/TLS certificate authorities by market share
According to data from W3Techs, the top 5 SSL/TLS CAs based on market share are:
- Let's Encrypt (56%)
- GlobalSign (13.8%)
- IdenTrust (12.8%)
- Sectigo (7.3%)
- DigiCert (5.3%)
Read their reviews on G2 to make an informed choice.
2. From web hosting providers, domain registrars, and SSL/TLS certificate software vendors
Alternatively, you can get an SSL certificate from web hosting providers and SSL/TLS certificate service providers.
Many web hosting providers, like Hostinger, HostGator, and BlueHost, and domain registrars, like GoDaddy and NameCheap, offer free DV SSL certificates as part of their plans from CAs, like Let’s Encrypt, GlobalSign, and SSL.com.
As mentioned earlier, if you just have one domain that you need to secure and are sure you won't be handling a lot of sensitive information, you can get the free SSL certificate from either CAs like Let'sEncrypt, SSL for Free or from web hosting providers and domain registrars like GoDaddy, Namecheap or BlueHost.
Please remember that the free SSL certificates expire every 90 days, so you need to renew them to avoid any mishaps. Some SSL providers also offer a 30-day or 90-day free trial you can consider if you are going for free SSL certificates.
However, for a higher level of validation, you need to purchase OV or EV certificates either from the CA or from SSL/TLS service providers who resell CA certificates.
SSL/TLS service providers are often the best option if you need assistance with certificate installation and management.
Top SSL/TLS certificate management software
The following are the top 5 SSL/TLS certificate software platforms that sell certificates and help with installing and managing them.
- AWS Certificate Manager
- Sectigo Certificate Manager
- Cloudflare Application Security and Performance
- Namecheap SSL Certificates
- SSL.com
Above are the top 5 SSL/TLS certificate software based on the G2 Summer 2024 Grid® Report.
After choosing your vendor and certificate type, you need to generate a CSR and keep it ready before you purchase the certificate from CA.
Note: Many hosting providers handle CSR generation and SSL deployment if you buy the certificate from them. Check with your web hosting provider and see if you can skip the CSR generation step.
3.Generate CSR
You have to have a CSR in order to obtain an SSL certificate. It’s a block of encoded text that contains information about your website, your public key, your company name, and your contact details. The CSR is sent to the CA to validate your request and issue the certificate.
Pro tip: Double check all your domain information with an ICANN lookup before generating your CSR so that what you submit matches with the WHOIS lookup used to verify your credentials.
There are three ways to generate a CSR.
- Using a web hosting control panel like cPanel
- Using an online CSR generator
- Using command-line tools on your web server
1. Using cPanel
If you have access to cPanel through your web host, generate your CSR there.
- Locate the SSL/TLS section in your cPanel dashboard.
- Look for options related to Certificate Signing Requests and follow the on-screen instructions. You'll typically need to provide details like your domain name, organization information, and contact email.
- Once submitted, you'll receive a CSR file containing your public key information and a private key file.
For example, let's see how to do this in BlueHost.
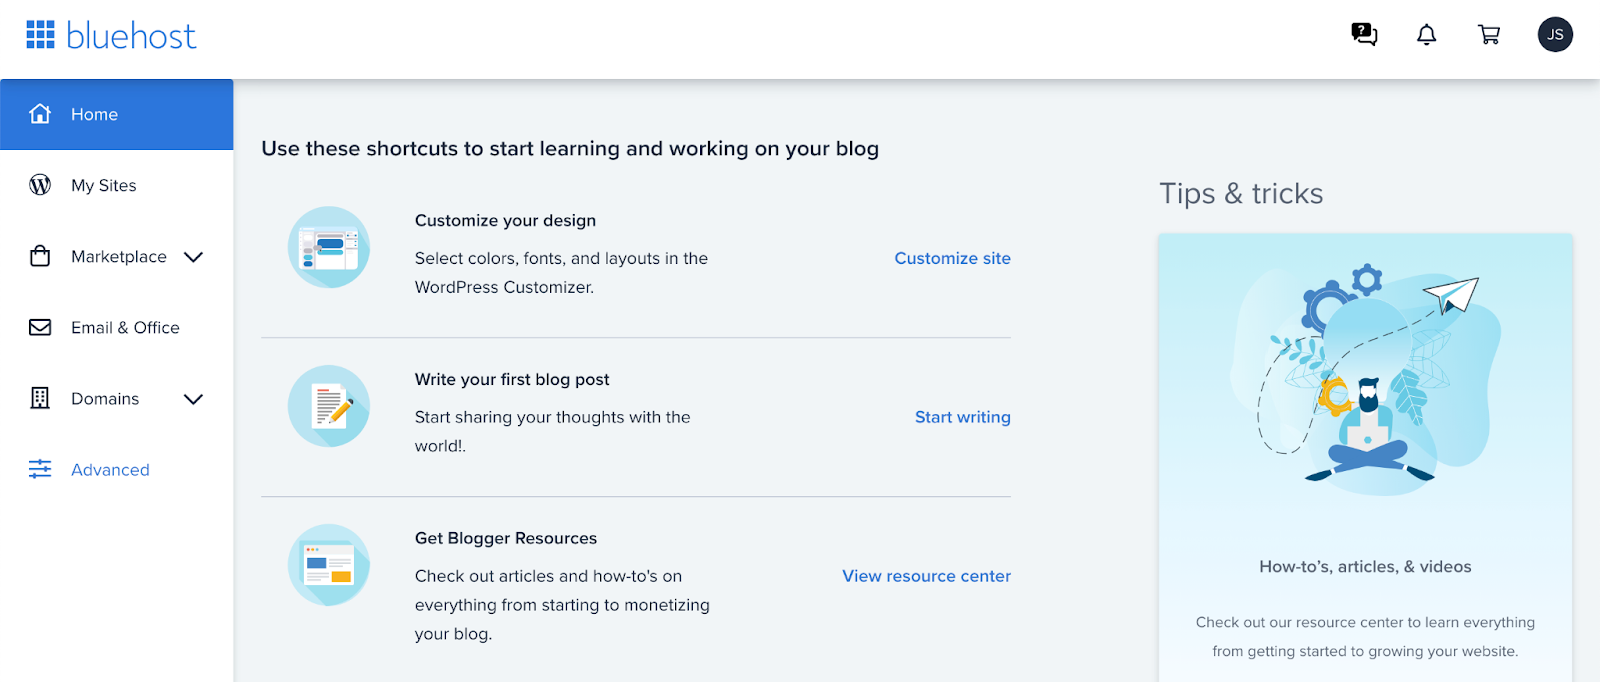
- Log into your BlueHost account and you can access cPanel by clicking on the “Advanced” option on the home page.
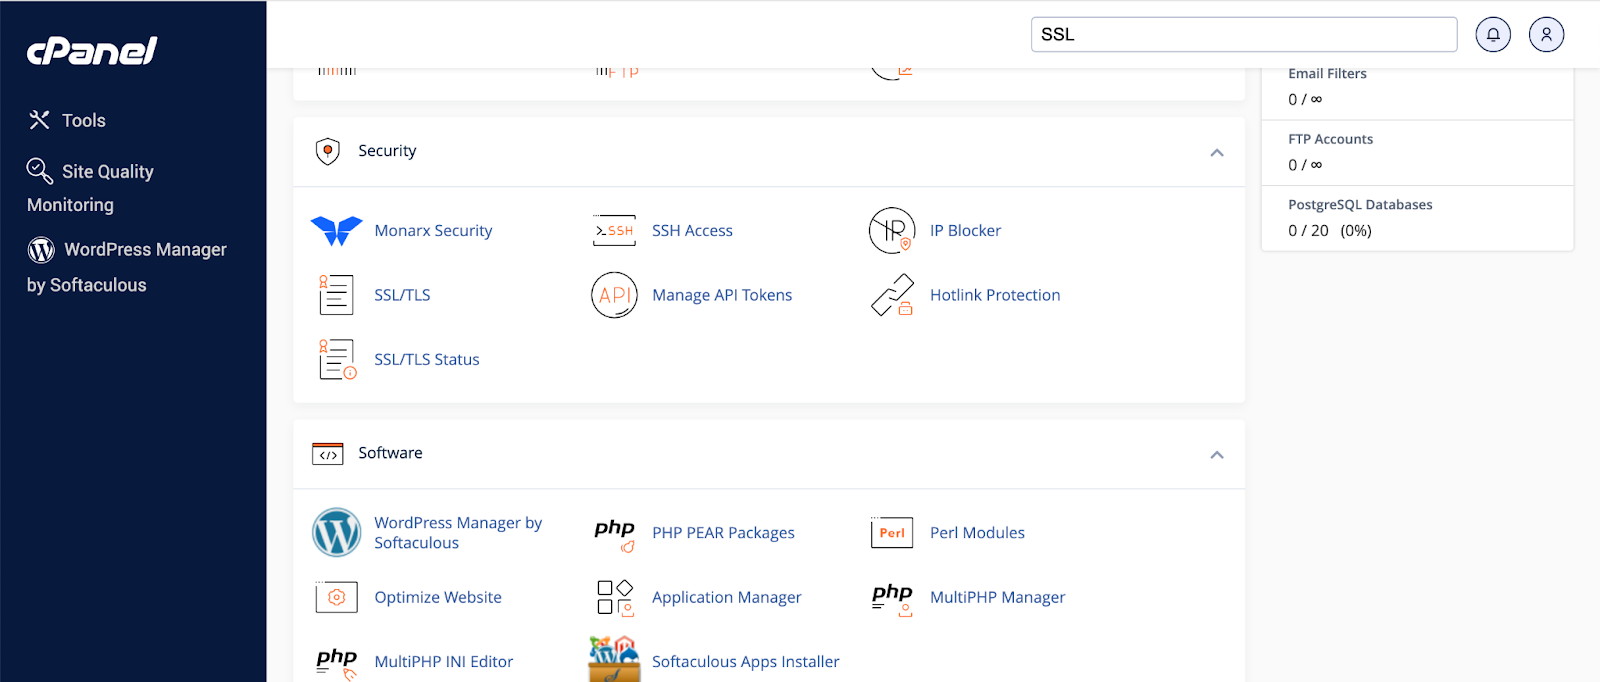
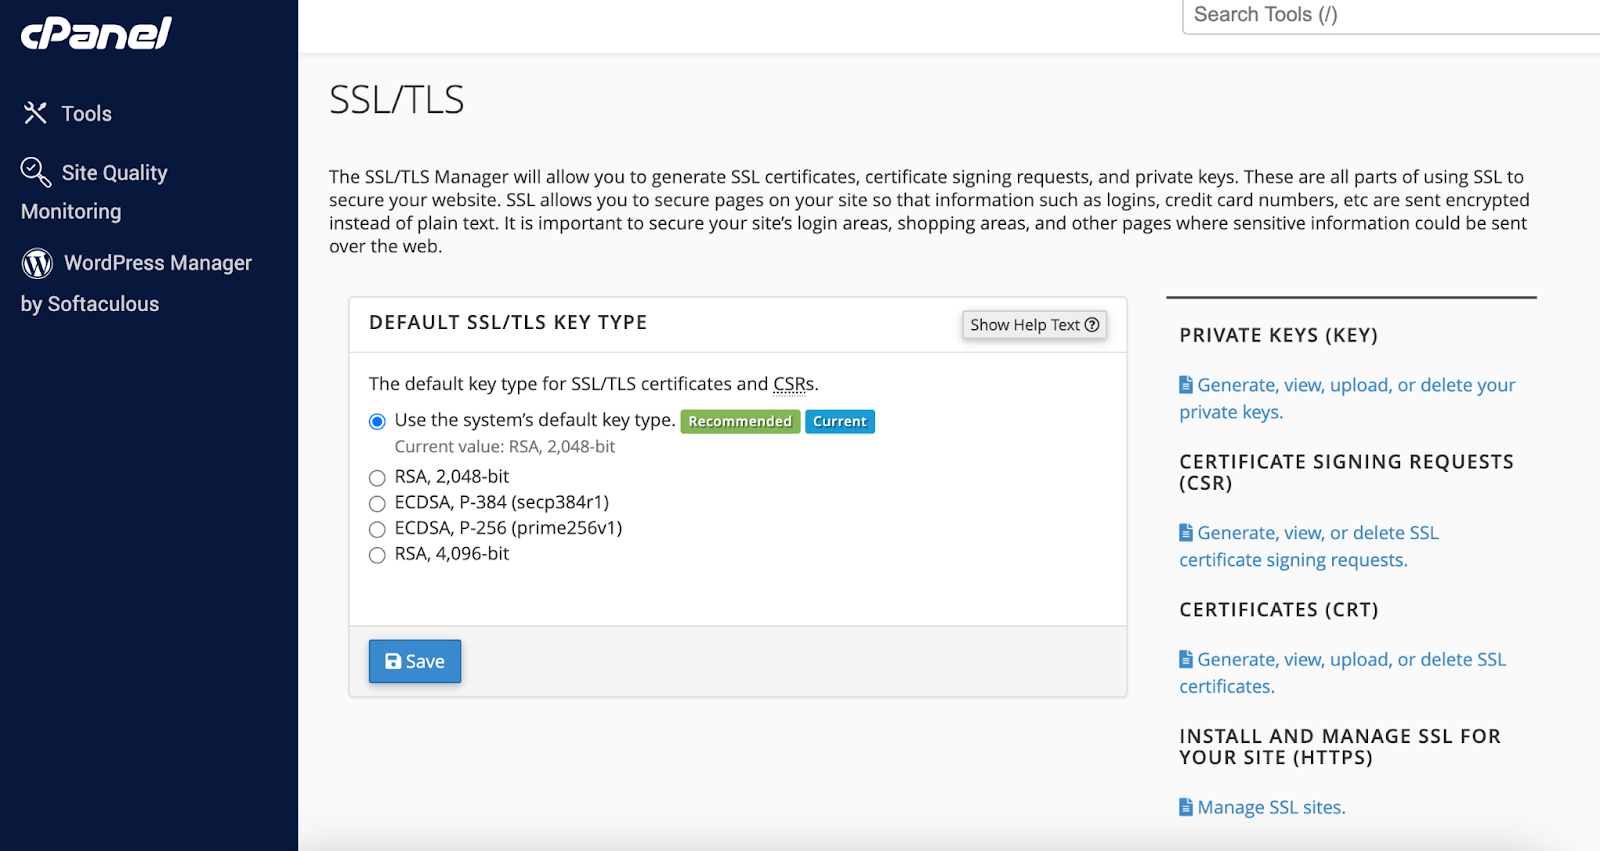
- In the cPanel dashboard, scroll down to the “Security” section. Click on the "SSL/TLS" icon to enter the SSL/TLS Manager.
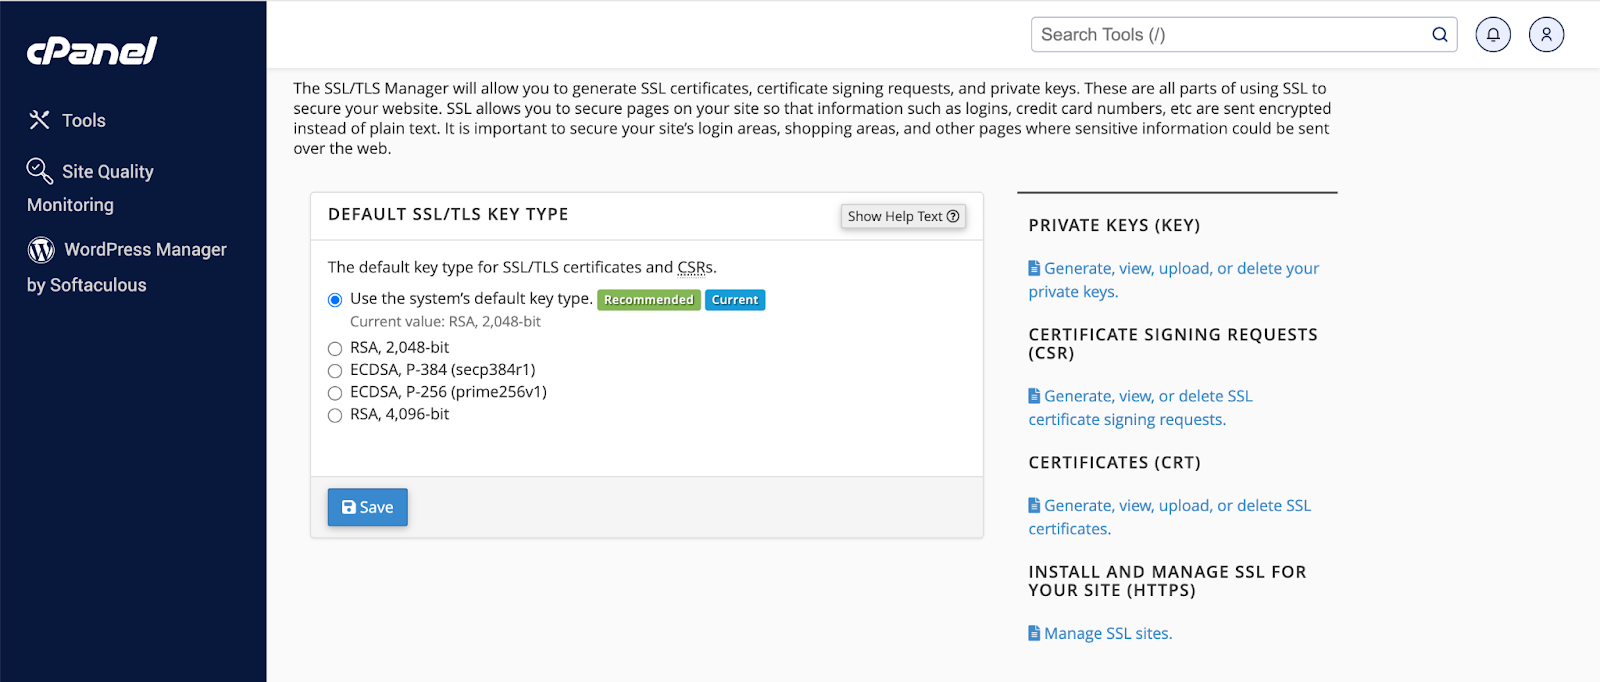
- In the SSL/TLS Manager, look for the Certificate Signing Requests (CSR)" section. Click on the Generate, View, or Delete SSL Certificate Signing Requests link.
- You will be presented with a form that requires specific details about your website and organization like:
- Common name, Enter the fully qualified domain name for which you are purchasing the SSL certificate. For wildcard certificates, enter the Common Name as *.yourdomain.com to cover all sub-domains.
- City. Enter the city where your organization is legally located.
- State. Enter the state or province where your organization is located.
- Country. Select your country from the dropdown list.
- Company: Enter the legal name of your organization. If you’re registering as an individual, you can use your name here.
- Company division. Enter the division of your organization that handles this request ( IT, web development). If you’re an individual, you can use NA.
- Email. Enter an email address where your CA can send notifications about your certificate request.
- Passphrase. Some CAs require a passphrase to validate the CSR. Be sure to remember it because you might need it later.
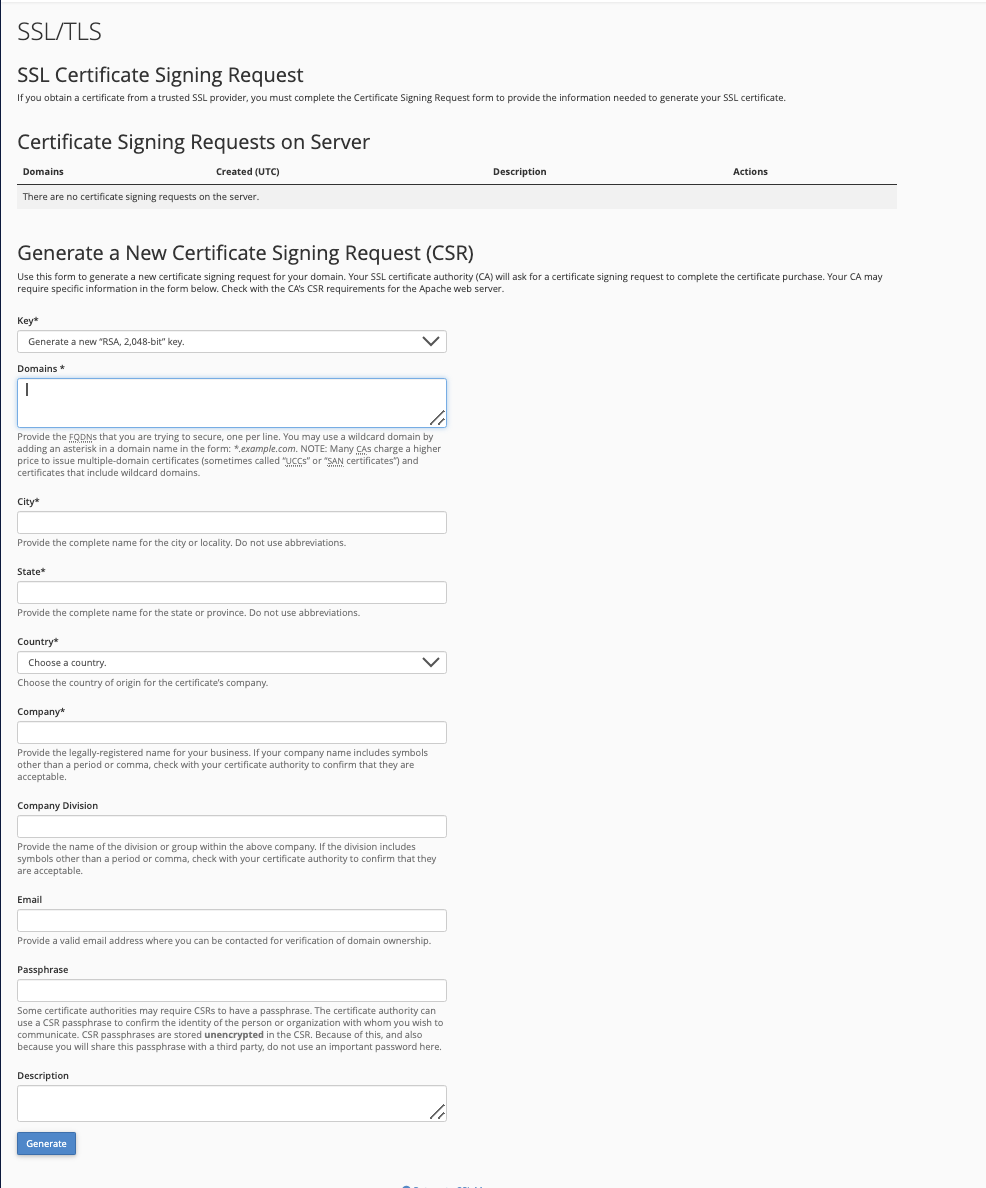
- Once you enter these details and click Generate, you will receive your CSR and private key.
Pro tip: Create backups of your CSR and private key files in a secure folder for safekeeping.
2. Using an online CSR generator
Alternatively, generate the CSR using online generators from CSRgenerator.com, DigiCert, or SSL.com. Follow the instructions provided by the online generator to fill in the required details. The tool will create the CSR and private key file that you can download.
Exercise caution when using online SSL tools since you're sharing sensitive information.
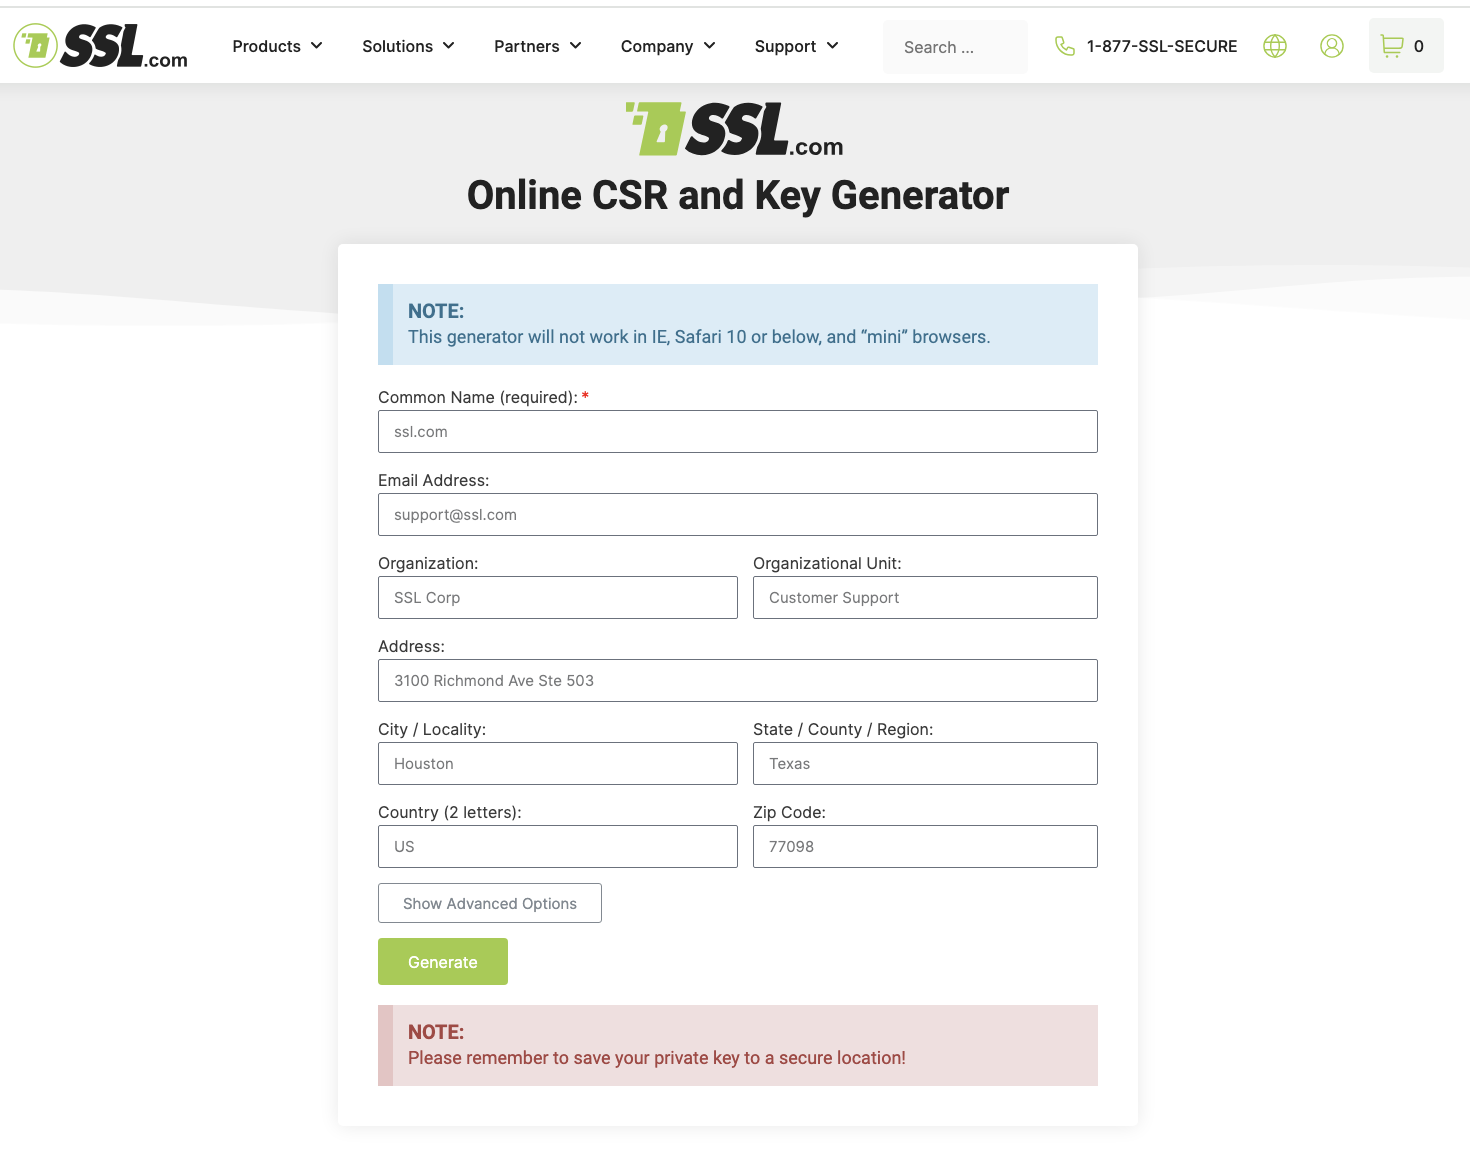
Screenshot of CSR generator from SSL.com
3. Using command-line tools on your server
This method involves using the OpenSSL command-line tool; it’s recommended for advanced users. You'll need direct access to your server and familiarity with command-line tools.
- Open Comand Prompt on Windows or Terminal on macOS.
- Run the following command after replacing yourdomain.key with your desired private key file name. Replace yourdomain.csr with your desired CSR file name.
openssl req -newkey rsa:2048 -keyout yourdomain.key -out yourdomain.csr
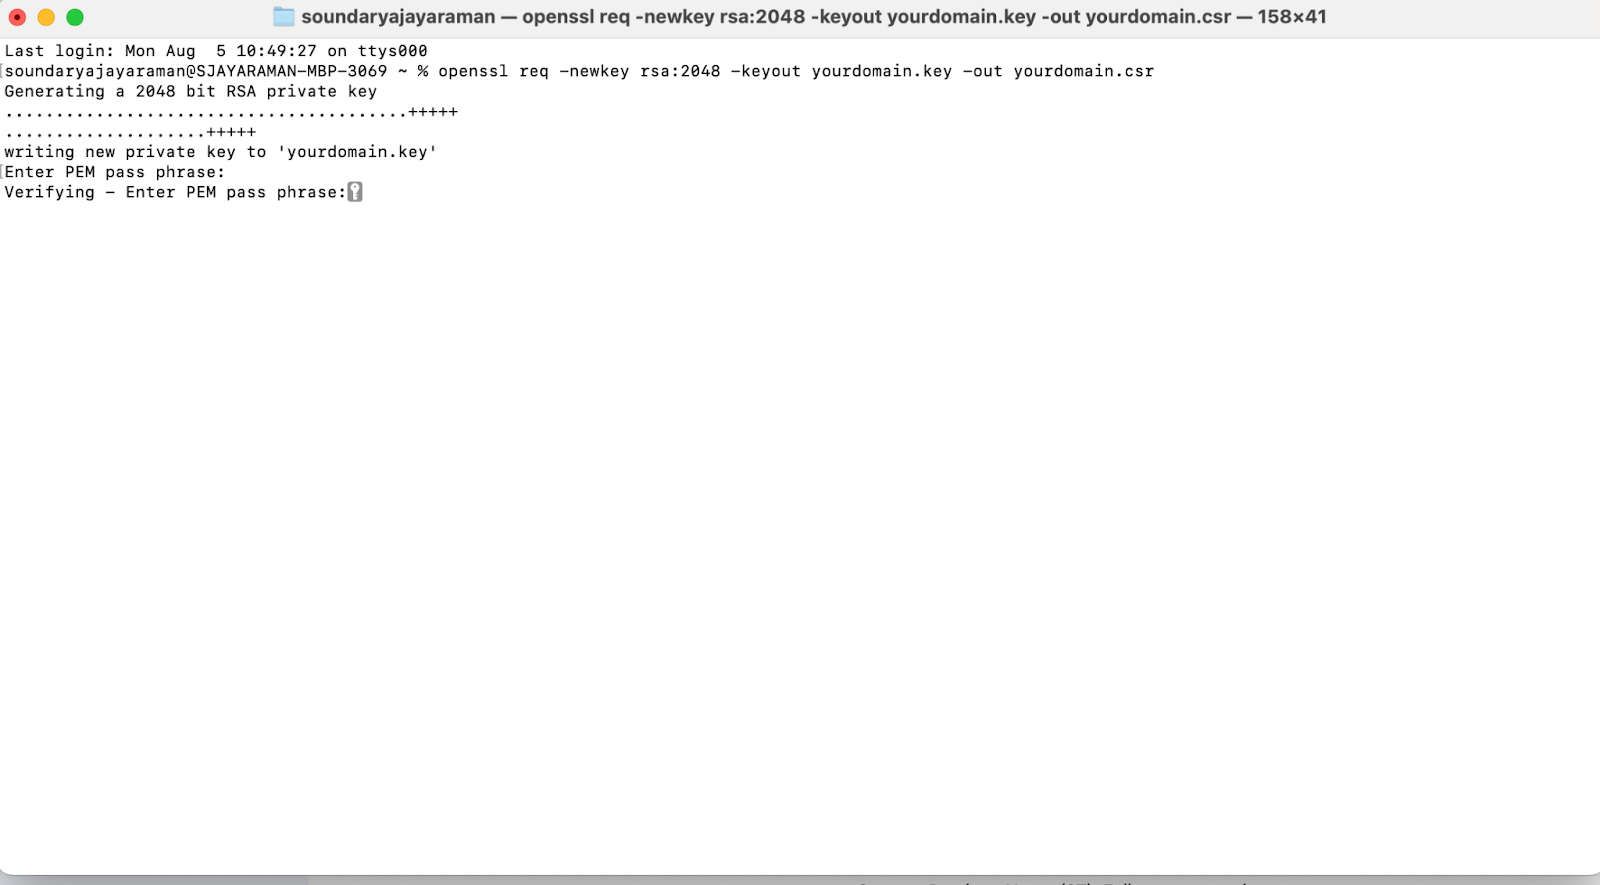
- You’ll be prompted to enter a passphrase that will protect your private key file. Enter the passphrase and verify it by re-entering it.
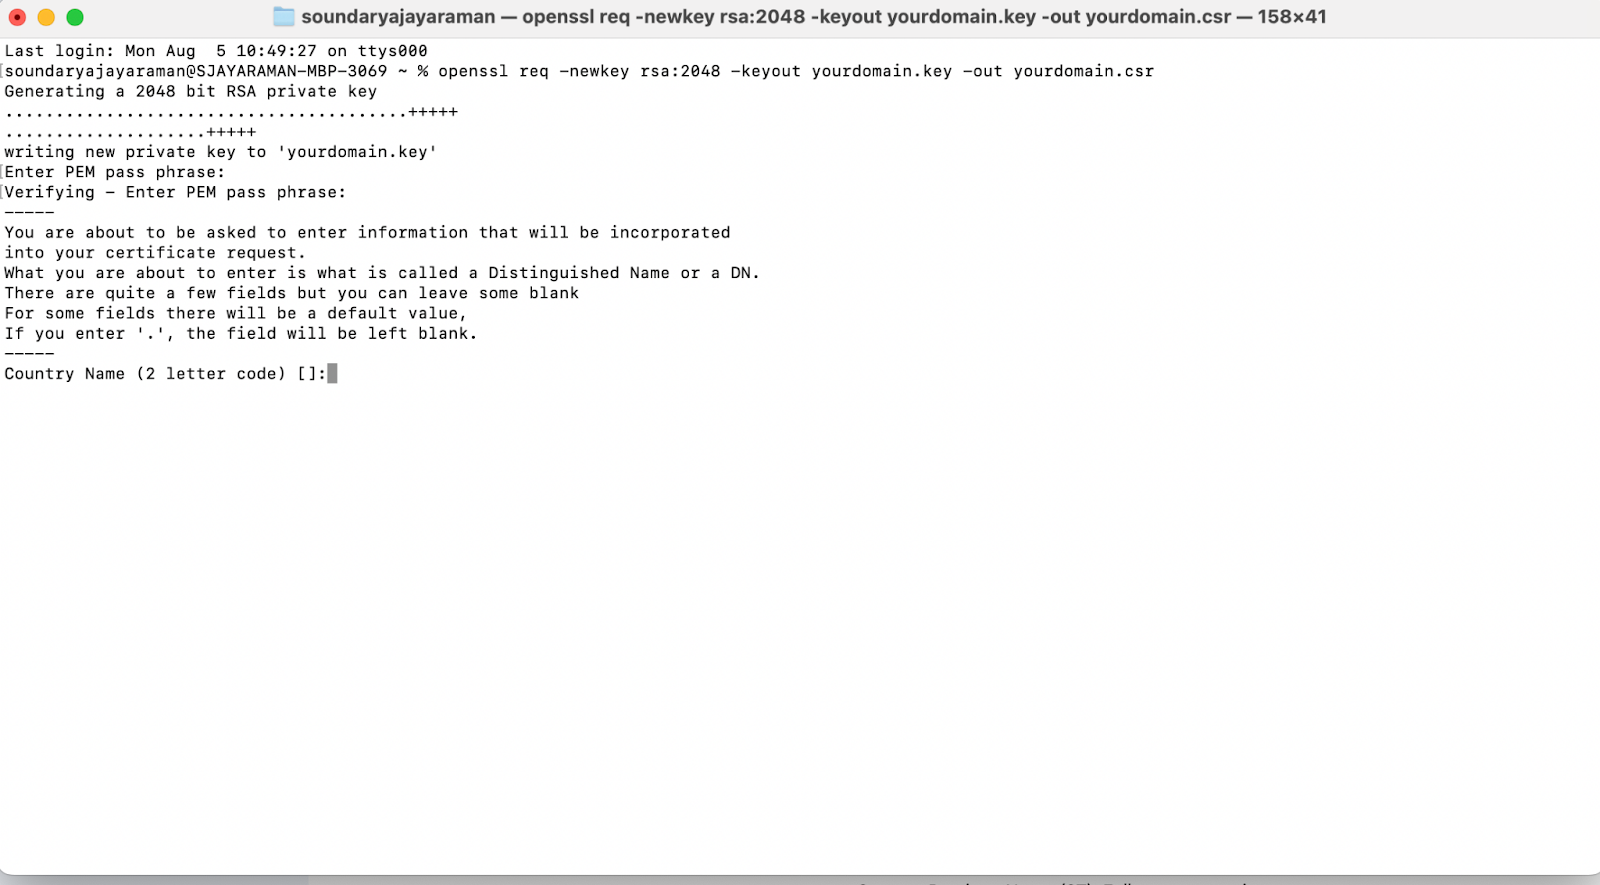
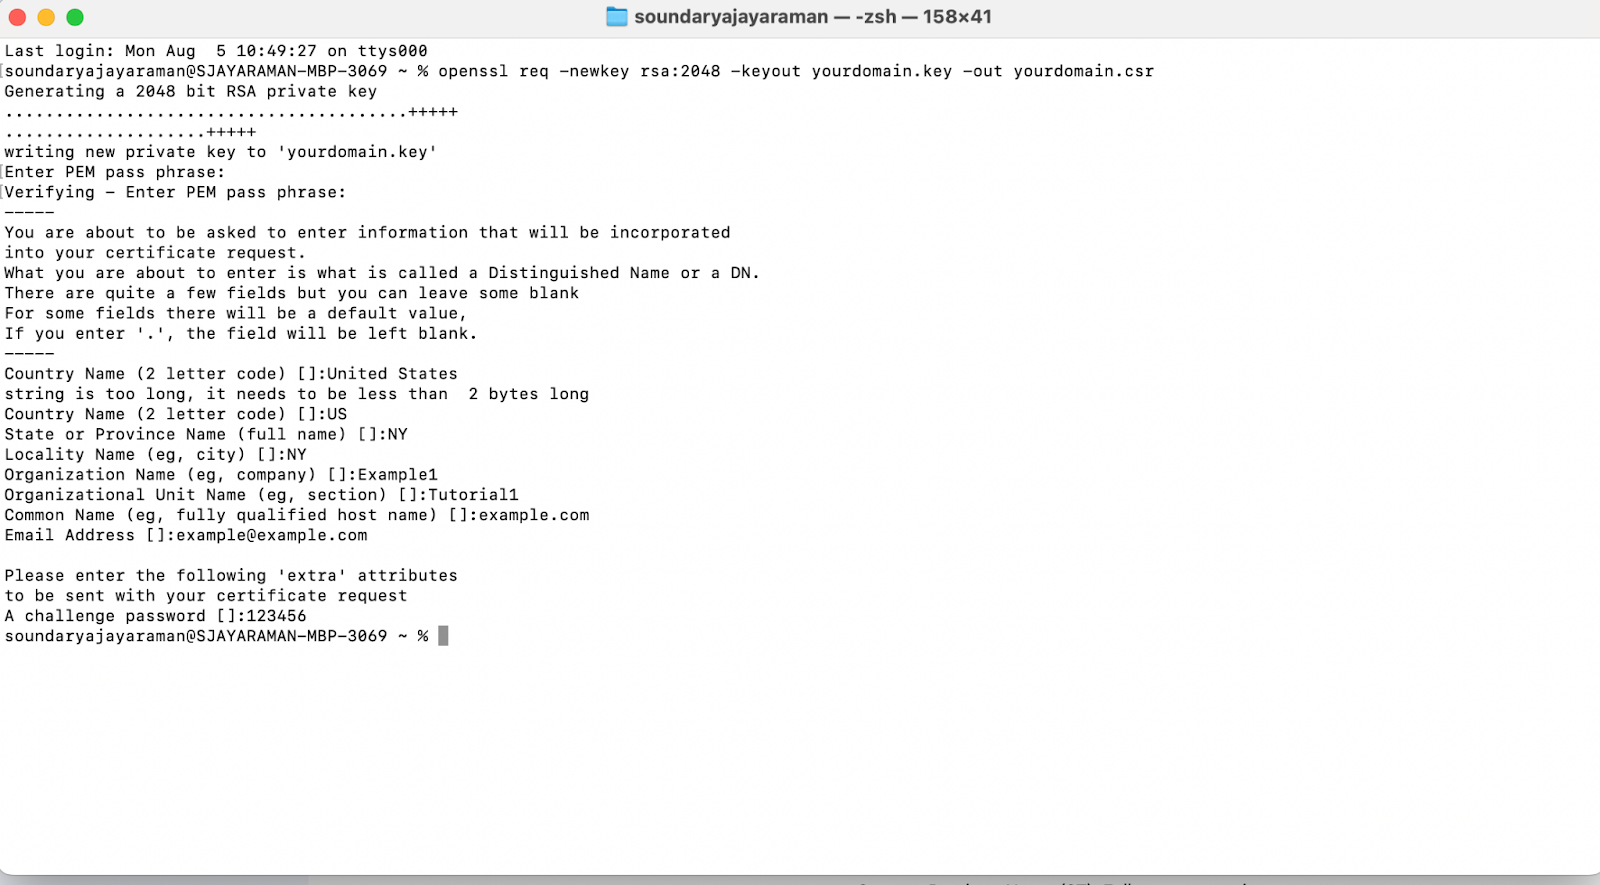
- You’ll now be asked to enter details that go into the CSR file.
- Once you complete this, your CSR and private key file will be created and downloaded automatically to your device. There will be no notification about this. Just check your downloads or your usual file storage location.
Refer to this resource by NameCheap for detailed instructions on generating CSR on different servers using other tools like Certreq or Powershell.
Pro tip: Copy the CSR file in Notepad or any text editor app and keep it ready for submission when you get your SSL certificate.
4. Submit the CSR to CA
Go to the website of the CA you’ve selected and create an account. Signing up usually entails entering your email address, creating a password, and completing an email verification process.
Choose the type of SSL certificate you need and follow the on-screen instructions to start the SSL certificate ordering process. When prompted, copy and paste your CSR into the provided field.
5. Complete the domain validation
The CA initiates the validation process based on the certificate type.
- DV SSL/TLS certificate: The CA might send an email to the domain's administrative contact or require you to place a verification file on your website or add a specific DNS record to prove your domain ownership. Domain validation usually takes just a few minutes.
- OV SSL/TLS certificate: In addition to domain ownership, the CA verifies the existence of your organization. This usually means you provide business documents like articles of incorporation or a business license. Organization validation generally takes 1-3 days.
- EV SSL/TLS certificate: This requires extensive checks on the organization's legal entity. The CA verifies business registration, physical location, and operational authority. Extended validation takes longer than OV upto 5 business days, as it involves more thorough checks.
Be prepared to provide necessary documentation and cooperate with the CA's verification procedures. Upon successful validation, the CA issues the SSL certificate.
6. Install the SSL certificate
Many web hosting providers automatically install SSL/TLS certificates if you purchase from them directly. If your provider doesn't offer this option, you'll need to install the certificate manually, but it’s an easy process. Here's how to install an SSL certificate:
Download the SSL certificate files from the CA. You’ll usually get three files.
- Primary certificate: This is the main SSL certificate file (often with a .crt extension).
- Private key: This is a secure file (usually with a .key extension), that corresponds to your public key. Keep it confidential.
- CA bundle (intermediate certificate): This file, often with a .ca-bundle or .crt extension, contains intermediate certificates necessary for building the certificate chain.
Installing via cPanel
Using the cPanel provided by your web host is the most common method for installing an SSL certificate. Here’s how to do it.
- Go back to your cPanel and navigate to the SSL/TLS section.
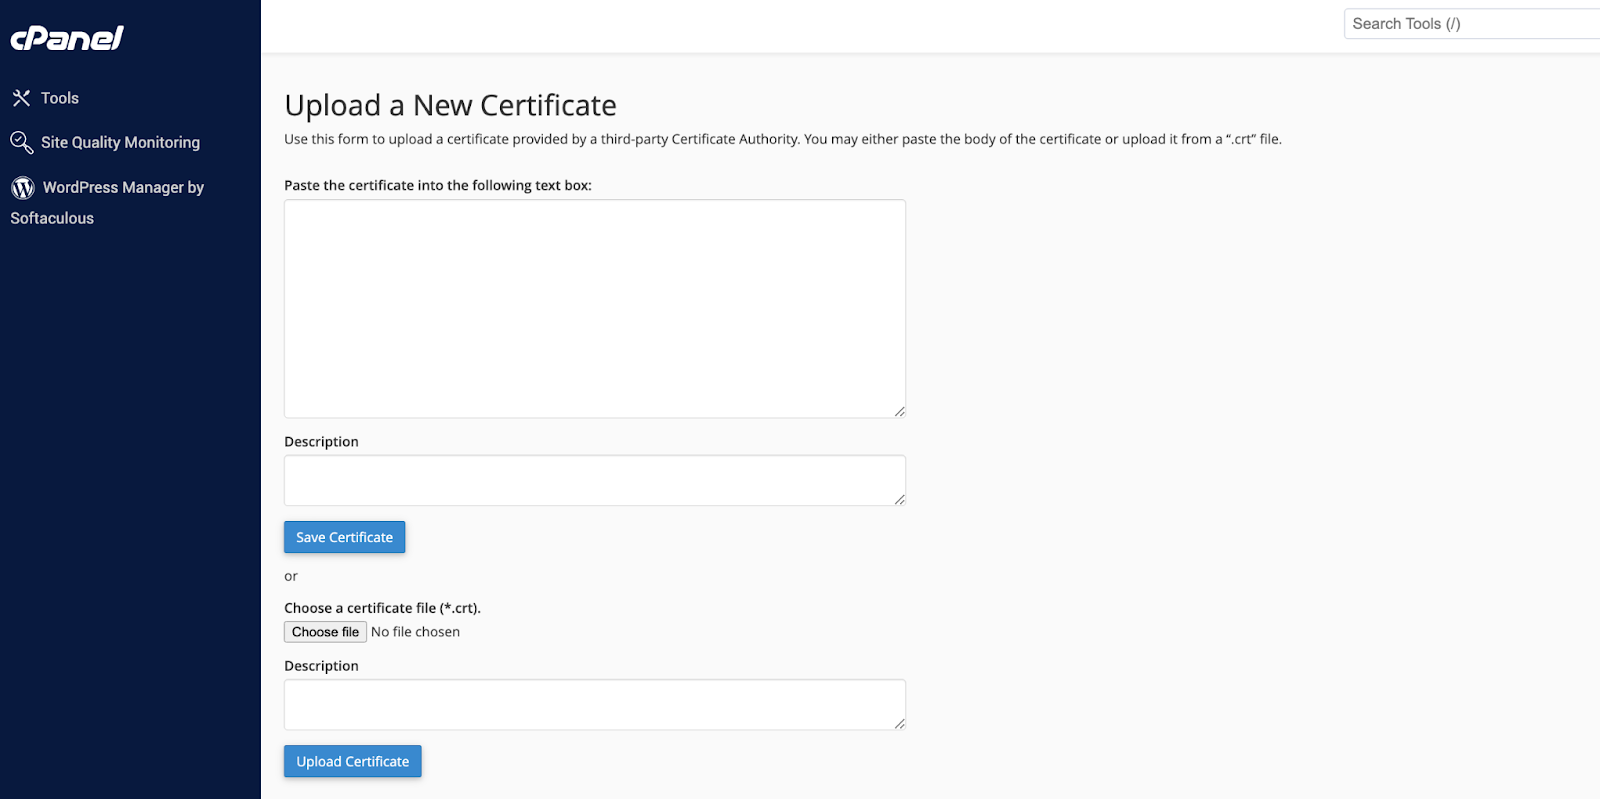
- Locate the Certificate option. Here, you can add a new certificate by uploading the entire file directly from your computer or by copying and pasting the content of your certificate file into the provided text box.
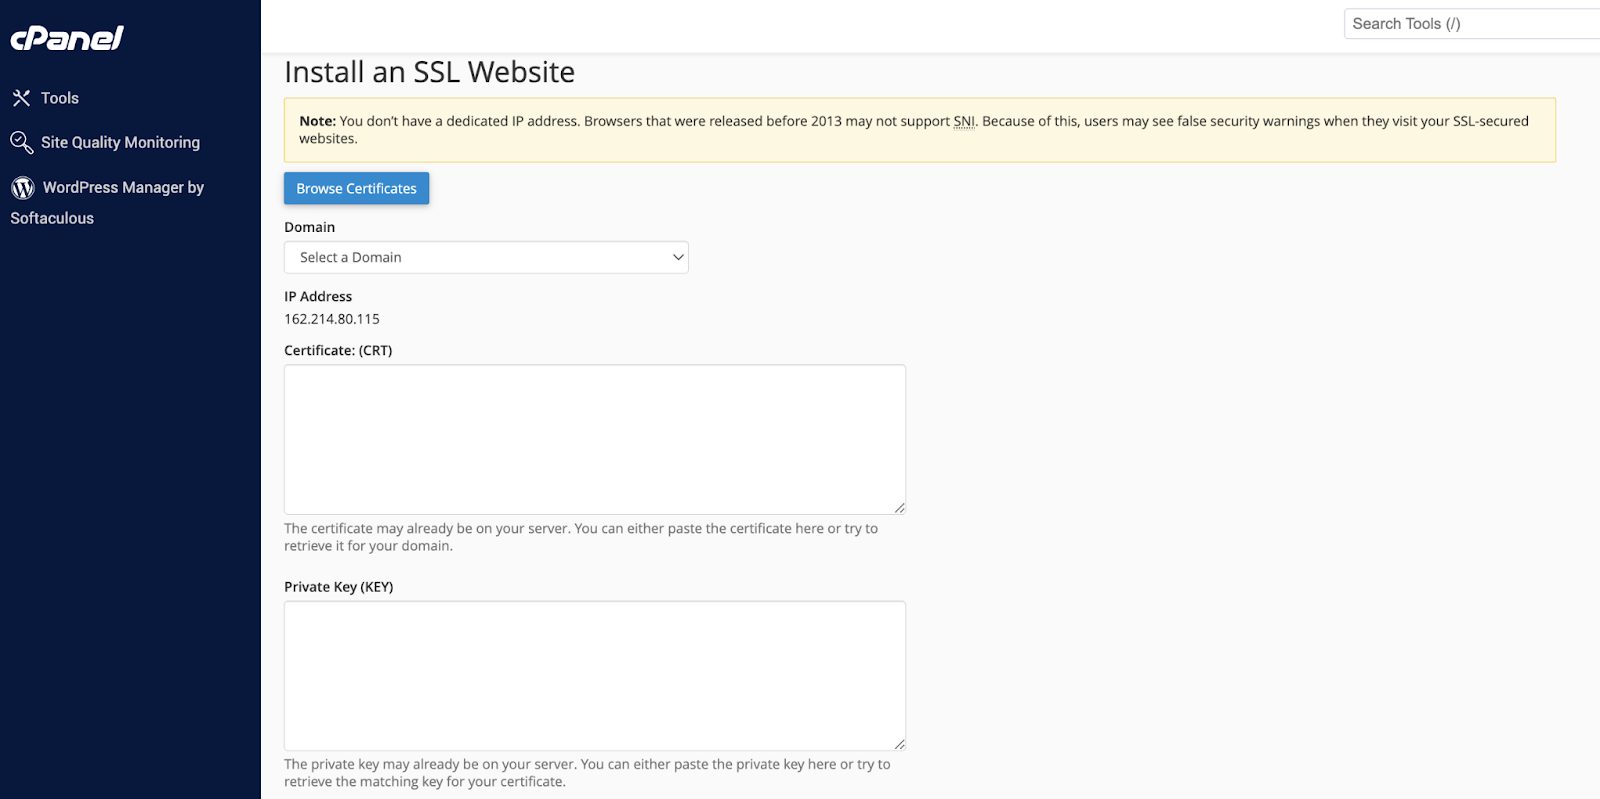
- Now go back to the SSL/TLS section and click on Manage SSL sites or a similar option.
- Select the domain for which you purchased the certificate and click on the Autofill by Domain” option. Your certificate file will auto-populate in the corresponding section. In rare cases, you may need to copy the content of the certificate file, private key, and the CA bundle into the text box provided.
- Once it’s filled in, click Install.
Note: The exact steps might vary slightly depending on your hosting provider and cPanel version. So, always refer to the documentation of your specific hosting provider for help.
For example, on cPanel accessed via BlueHost, you need to click on “Generate, view, upload, or delete SSL certificates” to upload the SSL certificate.
Once uploaded, go back and select Manage SSL Sites under Install and Manage SSL for your sites (HTTPS) section to install the certificate.
Installing on other platforms
If you have direct access to Apache, Nginx, or any other web server, refer to this resource by GoDaddy for detailed instructions.
7. Update your website to HTTPS
Once you’ve installed the certificate, your website will be accessible over both HTTP and HTTPS. You must redirect your website from HTTP to HTTPS to make certain that all visitors are directed to the secure HTTPS version of your site.
The best way to do this is to update your .htaccess file. If you use a WordPress site, use Really Simple SSL plugin. It automates the entire process of redirecting your site from HTTP to HTTPS.
Otherwise, follow the instructions to do migrate from HTTP to HTTPS using cPanel.
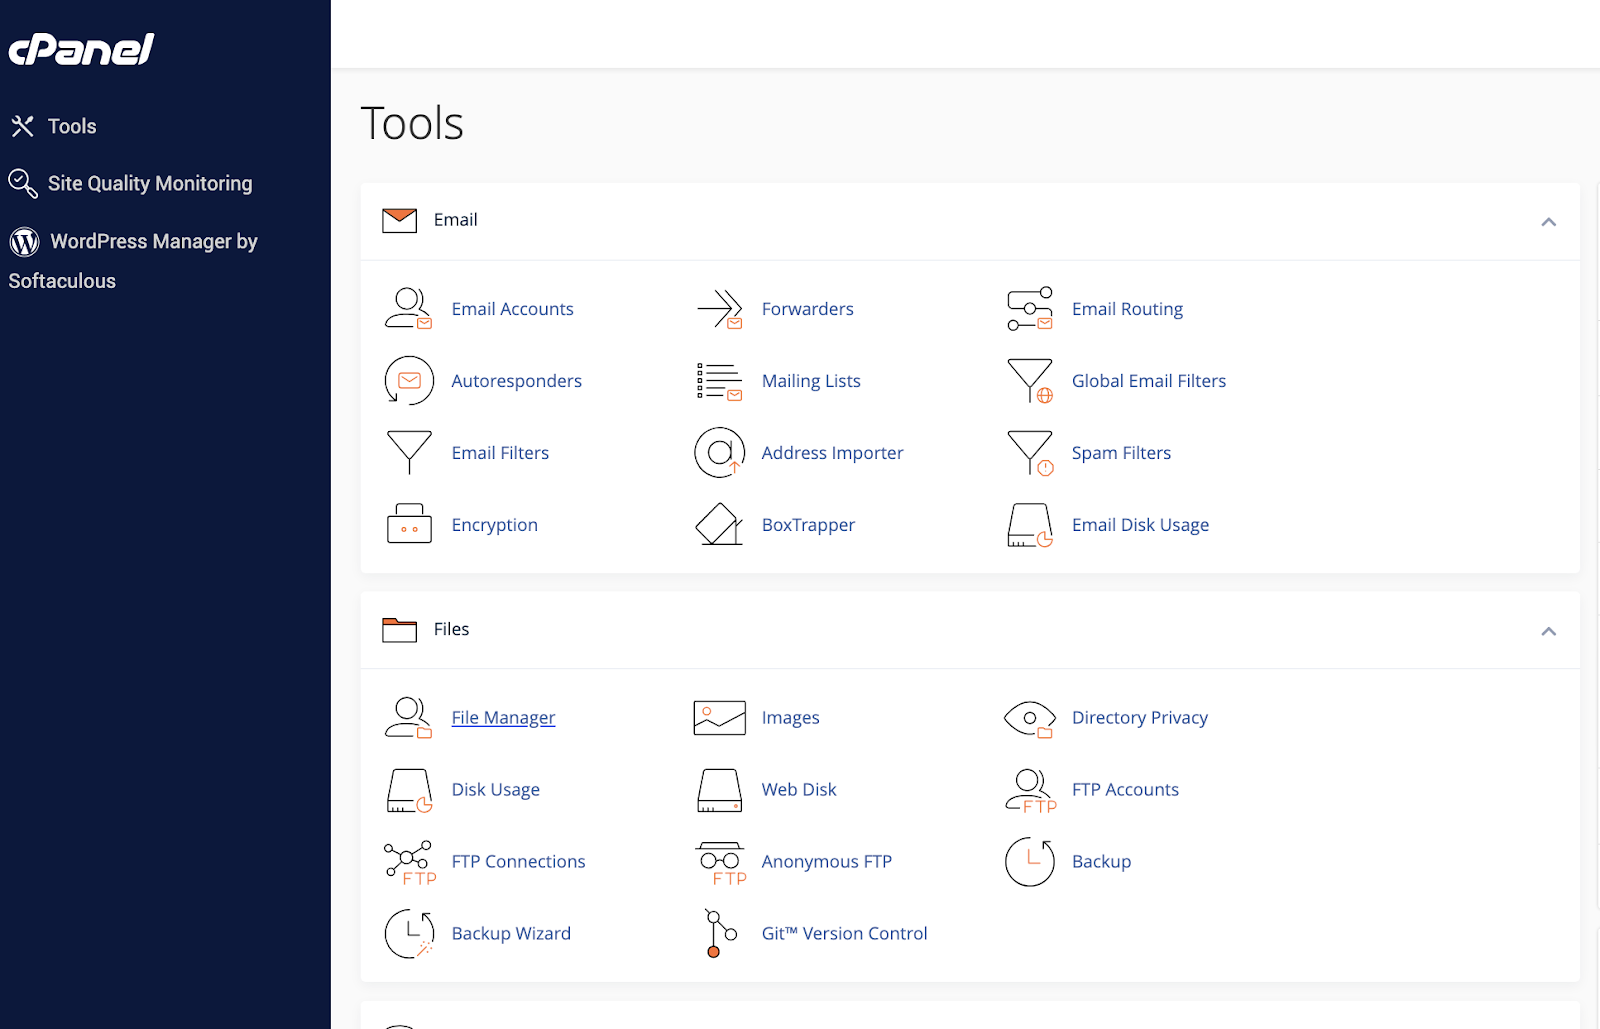
- Access File Manager: From cPanel’s main dashboard, go to File Manager under the Files section.
- Find the .htaccess file: Go to Settings and check Show hidden files.

- From the list of files displayed, right-click on the .htaccess file and select Edit.
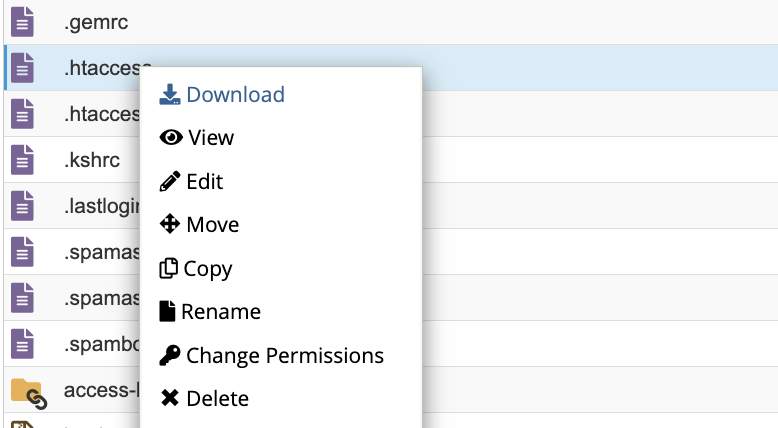
- Add the following lines to the .htaccess file to permanently redirect all traffic to HTTPS.
RewriteEngine On
RewriteCond %{HTTPS} off
RewriteRule ^(.*)$ https://%{HTTP_HOST}%{REQUEST_URI} [L,R=301]
- Save changes to the .htaccess file.
8. Verify your SSL installation
Now that you’ve installed the certificate and redirected your traffic to HTTPS, check to see if the certificate is working as intended. This helps you avoid any downtime due to SSL errors. Here’s how you do it:
- Access your website using HTTPS (https://yourdomain.com).
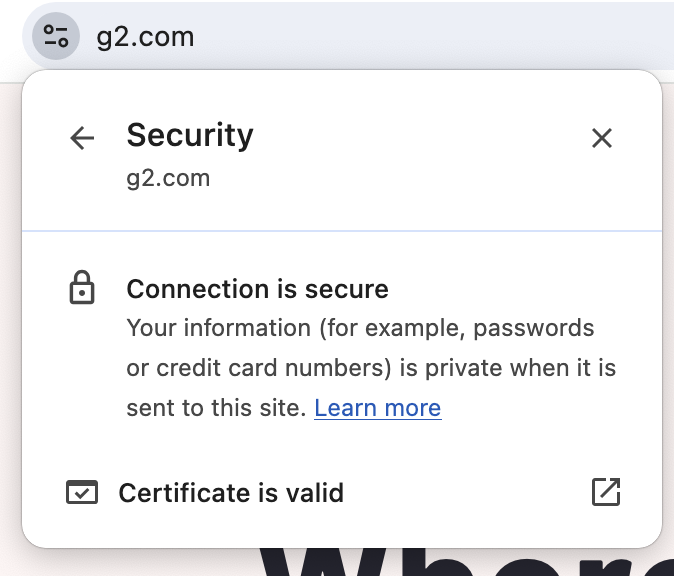
- Look for a padlock icon in the address bar of your web browser. This indicates a secure connection. Hovering over the padlock often displays details about the SSL certificate, such as the issuer and expiration date. For example, in the Google Chrome browser, you can find the padlock icon here.
- Confirm that all pages and features of your website load correctly when accessed through HTTPS. Check forms, images, and other content to verify they’re displayed without errors.
- Alternatively, you can use online SSL certificate checkers from services like SSLShopper, DigiCert, and SSLchecker.com.
Pro tip: Check the expiration date of your certificate and set up reminders for renewal to avoid any downtime or security warnings.
Frequently asked questions (FAQs) on how to get an SSL certificates
If you still have some questions related to the process of how to get an SSL certificate for your websites, read on to clarify them.
Q. Can I get a free SSL certificate?
A. Yes, there are free SSL certificate providers like Let’s Encrypt, Cloudflare, SSL.com, and ZeroSSL. These certificates are typically domain-validated and offer the same level of encryption as paid certificates.
Q. How much do SSL certificates cost?
A. The cost of SSL certificates varies depending on the type and the CA. Prices can range from nothing to hundreds of dollars per year for premium EV certificates.
Q. Where can I get an SSL certificate?
A. You can get an SSL certificate from various CAs and web hosting providers. Some popular options include Let's Encrypt, Sectigo (formerly Comodo) Cloudflare, SSL.com, DigiCert, GlobalSign, GoDaddy, Namecheap, and Bluehost.
Q. How long does it take to get an SSL certificate?
A. The time to get an SSL certificate varies depending on the certificate type. DV certificates are issued almost instantly. OV certificates take a few days for the organization validation process. EV certificates can take several days to weeks due to thorough validation.
Q. What happens if my SSL certificate expires?
A. If your SSL certificate expires, your website will not be secure. Visitors will see warnings in their browsers, and data transferred to and from your site will not be encrypted. Always renew your certificate before it expires to prevent these issues.
Q. How do I renew my SSL certificate?
A. SSL certificates need to be renewed before they expire. To do so, generate a new CSR and purchase a renewal from your CA. Install the new certificate on your server.
Site secured
You have now gone through the whole process of how to obtain an SSL certificate and install it for your domain. While it sounds technical, it is easy as long as you follow the steps here.
So, go on and choose an SSL certificate that aligns with your website's needs, considering factors such as domain coverage, validation level, and budget. Install the SSL certificate as shown. Regularly monitor your SSL certificate's expiration date to ensure uninterrupted security. Your website deserves the best protection. Secure it now.
Take the next step toward reliable website security. Read this free G2 guide on web application firewalls (WAF) to understand why you need it.
Soundarya Jayaraman
Soundarya Jayaraman is a Content Marketing Specialist at G2, focusing on cybersecurity. Formerly a reporter, Soundarya now covers the evolving cybersecurity landscape, how it affects businesses and individuals, and how technology can help. You can find her extensive writings on cloud security and zero-day attacks. When not writing, you can find her painting or reading.

